***You can purchase a book in paperback or on Kindle on the I Do, or a 90-minute online workshop that you can share with colleagues at a CPD event or departmental meeting***
The I Do is the lesson phase where the teacher explains and models a procedure to students.
Diagnosis
Think about your most recent I Do:
- What did you do?
- What did your students do?
- What challenges did you face?
Evidence
A robust finding from research is that worked examples are an effective way for novice students to learn a procedure. But exactly what that worked example (what we will call the I Do) should look like is up for debate.
Here are three approaches to the I Do I regularly see that I do not think are effective:
1. The co-construction
Here, the teacher wants the students to be involved in every solution step. This is based on the self-evidential belief that learning must come from the students and cannot simply be imparted by the teacher. However, the reality of doing this in the classroom is often a bit of a mess.
Recently, I watched a teacher deliver an I Do about rationalising the denominator. His opening gambit was: Now, I have not taught you this, but I wonder if any of you can figure out how to remove the surd from the denominator of this fraction.

After nearly 9 minutes, with much prompting, one student came up with the correct approach. But many students were left confused, and several had switched off, their attention reserves completely drained.
I fell victim to this approach for about 12 years. I was scared to tell my students how to do something, so I would ask them questions they had little chance of answering correctly because the questions concerned the very novel process they were about to be taught. At its worst, this became a game of Guess what was in my head. Time and confusion are the heavy prices you pay.
2. The lecture
At the other end of the spectrum, we have the lecture. Here, the teacher runs the show, taking their students through each step of the process, line by line. The students are silent.

At their best, the teacher explanations accompanying these lecture-style I Dos are clear and concise, giving students the best chance to follow them. However, I have seen (and delivered!) enough of these to know that the explanation can often be protracted and unclear, negating potential time savings and confusing the students.
Carefully planned – or even scripted – explanations can help. But they do not solve the biggest problem with lecture-style I Dos: How do we know the students are listening? Sure, students may be silent and looking at us. They may even be nodding and smiling. But are they listening?
When the teacher in the example above set her students off on the We Do, three students put their hands up:
- Student 1: Where did the 18 come from?
- Student 2: What do we do first?
- Student 3: How do you find the bottom number?
We have discussed how teachers get seduced by such poor proxies for listening. But without hard evidence, we cannot be sure. And, of course, if students do not listen, they will be unlikely to understand.
3. The hybrid
Surely the solution is to do a bit of both? So, only check students’ understanding for steps in the solution they should know because they are relevant prior knowledge, and essentially lecture them on the rest.
However, I am not sold on this approach either. The checks for understanding of relevant prior knowledge often reveal that knowledge is not as secure as we hope, so suddenly, the I Do is derailed while the teacher intervenes. And if the student selected gets the check of prior knowledge question correct, does that mean everyone else understands it?
Listen to what happens here as this hybrid I Do comes off the rails:

Or this I Do, where the teacher does a bit of questioning and a bit of explaining, and things all get a bit muddled up:

Hybrids also do not solve the problem inherent with the lecture approach – namely, for those parts of the I Do that the teacher chooses to tell the students, how do we know they are listening?
My experience of the hybrid approach is that it tends to be chaotic. Instead of being the best of both worlds, it ends up being the worst of both, with students unaware of their ever-changing roles.
We can do better!
Solution steps
Part 1: Where does the I Do fit into a Learning Episode
In a previous section, I shared my Building Blocks of a Learning Episode:

The I Do is sandwiched in between Atomisation and the We Do. This positioning is critical:
- Because we have assessed understanding of prerequisite knowledge during Atomisation, we do not need to do so again during the I Do.
- Because we will check for understanding of the new procedure during the We Do, we do not need to do so during the I Do.
This allows us to deliver a clear, concise, teacher-led explanation to our students.
Part 2: Focussing thinking
We must take steps to maximise our students’ ability to pay attention to give them the best chance of following the I Do.
1. Empty hands, eyes on me
Often, students are distracted during an I Do.
They could be doodling on their mini-whiteboards:

On pieces of paper:

Or their hands:

But there is another scenario that is just as problematic:

Teachers regularly ask students to copy down the steps of the I Do during the I Do itself. Look at the students in the picture above.
- Where are their eyes? They are looking down at their books, missing the key gestures the teacher is making on the board.
- Where is their attention? It is on the previous step they are writing down, not on the current step that the teacher is modelling.
During the I Do, students should have empty hands and eyes on the teacher.
Consider adding a note to your slide to remind you and your students:

So, when should students copy down the I Do?
- Worst time: During the I Do
- Not much better: Immediately after the I Do. Nothing kills the pace of a snappy I Do than asking students to copy it. This is also when the I Do makes the least sense to students.
- Better: After the We Do. The I Do now makes more sense to students, and can provide a transition from the We Do to independent practice.
- Even better: At the end of the lesson. Now, the I Do makes the most sense to students, so they can fully engage in copying it out, adding annotations to help their future forgetful selves make sense of the steps.
- Best: Don’t bother. I think copying down examples is massively overrated. I have never met a student who revises by looking back in their exercise books, and you can leave the example visible on the board during the lesson if students need to refer to it:

Instead, use the time you save to give students more practice. I discuss copying down further here.
2. Ensure students can see and hear
Often, teachers position themselves in such a way that some students cannot see the board:


Or talk facing away from the students so that they cannot hear:

To ensure all our students can see and hear, routinely step away from the board, and speak facing our students.
3. Avoid unnecessary visuals and words
The Coherence principle states that unnecessary visuals and words eat up working memory capacity, drawing students’ limited attention away from what they are supposed to be learning.
I Do slides crammed full of titles, logos, and learning objectives fall victim to this:

Then, we have seductive details – interesting pieces of information that are irrelevant to achieving a learning objective, such as a static image or a GIF.

As the teacher was going through the I Do, I overheard the following comments from students:
- Why have they only nicked £20?
- Why are they walking like that?
- He looks like Dylan!
- Who the hell is Jo?
4. Keep the We Do hidden
To help focus students’ attention on the I Do, do not have the We Do visible:

Students might start thinking about those questions and miss a key insight from the I Do.
5. Model live
Often, I watch I Dos where the teacher clicks through an animated PowerPoint, each line appearing at the click of a button:

Whilst this looks neat, I think it is problematic for several reasons:
- There is a disconnect between what the teacher is doing (clicking a button), and what the students will do (writing in a book).
- Because clicking a button requires no thought, the pacing is often too fast for students.
- The Dynamic Drawing Principle suggests that rather than presenting pre-drawn graphics, teachers should draw graphics on the board as they lecture. This is especially important for low-knowledge learners, as it helps them focus on the important information in the lesson.
- Modelling live allows for greater flexibility. I watched a lesson where a student shared an excellent method to solve a circle theorem question:

But it was not the one pre-animated on the slid:

So, the student was left unsure as to whether their answer was correct.
Teachers may model live at the board, using a tablet, or under a visualiser.
I favour a visualiser.
The teacher can face the class, which can improve behaviour and how clearly students can hear:

The teacher can also use the same tools (books and equipment) that their students use:

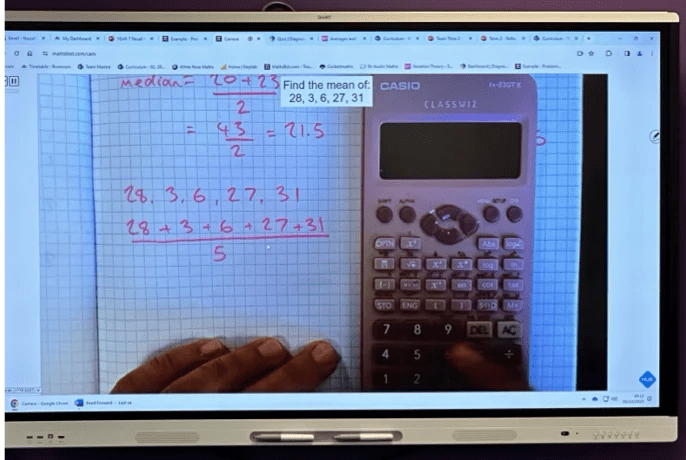
Using a visualiser also taps into interesting research, suggesting that a visible hand is important to improve students’ focus during modelling and, hence, their learning.
6. Narrate diagrams, then add written text
Research suggests that people learn more deeply from graphics and narration than graphics and on-screen text. Text and narration are processed in the auditory component of working memory, which can result in an overload.
So, present a diagram first (static or dynamic):

Verbally explain it, and add text labels later.

7. Integrate text and diagrams
The Split-Attention Effect states that information that must be combined should be placed together in space and time to enhance learning. When our I Do contains a diagram, we can avoid falling victim to the Split-Attention effect by carefully integrating text labels.
So, instead of this:

We have this:

8. Don’t talk over novel text
Research suggests that when we present the same information in multiple modalities, we hinder student learning. A common way this occurs during the I Do is when the teacher displays text on the board and then reads it out loud. The same information has to be processed in the auditory component of working memory, risking overload.
The solution is to either remove the text and speak:

Or keep the text and keep quiet so students can read it:

Part 3: Deliver a clear explanation
Now that we have created the conditions to allow our students to focus, we must ensure that what we say is worth focussing on. If you ask any teacher what makes a good explanation, they will tell you it needs to be clear. But what does clear actually mean?
To help, here are the transcripts from the audio of three teacher explanations, captured verbatim in the classroom.
Example 1: Quadratic equations

Right… so… um, when we have an equation with an x-squared kind of like this… or, in fact pretty much, any letter squared… it doesn’t need to be x, it could p or q, or anything in fact… we call these letters unknowns… so when they are squared… I mean so the exponent needs to be 2… um, so equations that have a squared term in them, you know, they are called quadratic equations.
Example 2: Rounding

Okay, and first thing I’m gonna do is I’m gonna have a look. Well, what have I got actually going on here? Okay, but place value three, that’s going to be my one, so I’m going to put ones above it, and then I put my first decimal place, okay? And it’s my first decimal place, but it’s the first number after my decimal point. Okay, some people often think my first decimal place is five, but not quite okay. We’re going with the four, and that place value is just going to be called one over 10. Okay, that’s how we represent the first decimal place. Okay, looking at five second decimal place, y, over 100. We call those tents and hundreds.
Example 3: Area

So this lesson, what we’re going to be focusing on is diagrams and seeing what it represents as in terms of refraction. So if you look at this grid here, this grid is 10 by 10. So 1-234-567-8910, running along this side, and there’s 10 running along this side. So we call it 10 by 10 grid. So if you times the two length and the width together, okay, that’s like the area, you end up getting 100. So this box quickly, if you want to add each individual, the trick is if you just count the length, count the width, just times the two numbers together. So in this case, how much of this tall grid is shaded in terms of numbers? Yeah, 61, yeah. So yeah, 12345, so this is 123467, along here, 10 along here. That’s 70 plus the 1, 71, so that’s a little trick. That’s how you do it.
You may wince at these explanations – one of which is mine! In the classroom, they didn’t sound too bad. But then, we are subject experts, so we can follow them. Only when they are written down, in black and white, can we appreciate how unclear they are.
To improve them – and the explanations we give in future – we need to use concrete principles from research.
1. Avoid vagueness
Research suggests that high frequencies of teacher vagueness terms inhibit student achievement. Further research suggests that students’ cognitive load is reduced, and learning and satisfaction are improved, when these sorts of vagueness are removed.
Here are some examples of such vagueness:

We can see examples of vagueness, highlighted in bold, in the first transcript:
Right… so… um, when we have an equation with an x-squared kind of like this… or, in fact pretty much, any letter squared… it doesn’t need to be x, it could p or q, or anything in fact… we call these letters unknowns… so when they are squared… I mean so the exponent needs to be 2… um, so equations that have a squared term in them, you know, they are called quadratic equations.
2. Avoid mazes
Mazes are units of discourse that do not make semantic sense. They are defined as false starts or halts in speech, redundantly spoken words, and tangles of words. Like vagueness, research suggests mazes inhibit learning.
The key culprits are:
- Uh
- Um
- Okay
- Like
- So
We can see examples of this vagueness in the third transcript, with the word So highlighted:
So this lesson, what we’re going to be focusing on is diagrams and seeing what it represents as in terms of refraction. So if you look at this grid here, this grid is 10 by 10. So 1-234-567-8910, running along this side, and there’s 10 running along this side. So we call it 10 by 10 grid. So if you times the two length and the width together, okay, that’s like the area, you end up getting 100. So this box quickly, if you want to add each individual, the trick is if you just count the length, count the width, just times the two numbers together, times the two numbers together. So in this case, how much of this tall grid is shaded in terms of numbers? Yeah, 61, yeah. So yeah, 12345, so this is 123467, along here, 10 along here. That’s 70 plus the 1, 71, so that’s a little trick. That’s how you do it.
3. Avoid discontinuity
Research suggests that learning suffers when the teacher digresses from the lesson’s logical flow to interject information.
I have highlighted an example of this in bold in the second transcript:
Okay, and first thing I’m gonna do is I’m gonna have a look. Well, what have I got actually going on here? Okay, but place value three, that’s going to be my one, so I’m going to put ones above it, and then I put my first decimal place, okay? And it’s my first decimal place, but it’s the first number after my decimal point. Okay, some people often think my first decimal place is five, but not quite okay. We’re going with the four, and that place value is just going to be called one over 10. Okay, that’s how we represent the first decimal place. Okay, looking at five second decimal place, y, over 100. We call those tents and hundreds.
The highlighted section interrupts the flow of the explanation on rounding. It is relevant, but is an example of prerequisite knowledge that should be addressed during the Atomisation phase of the lesson that precedes the I Do.
How can we prevent falling into these traps?
Eliminating vagueness, mazes, and discontinuity is hard to do. Trust me, if you record yourself explaining and play it back, you will likely find examples of all three.
The best way to avoid them is to plan your explanations before entering the classroom. Bullet point exactly what you are going to say. Rehearse saying it out loud. Better still, do this with a colleague, independently planning your explanations for the same example and then comparing what you wrote. The results are always fascinating.
Then, take your preplanned explanations into the classroom with you. Read them from a script if you need to. Eventually, you won’t have to do this. With enough practice, you will find you naturally explain more clearly.
Here are three preplanned teacher explanations for the same worked example. I will let you to decide which you think is the clearest using the three principles above.

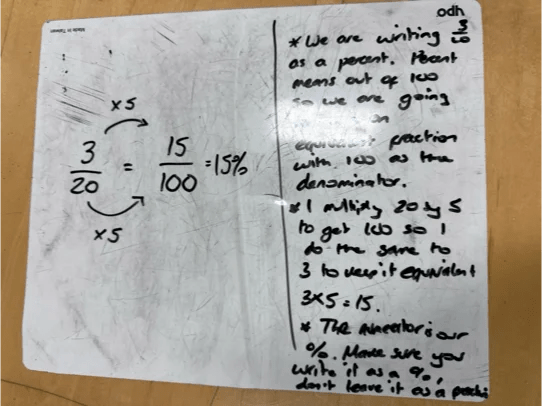

An increase in clarity often coincides with an increase in concision. We know that students attention is limited. One of my critiques of the Co-constructed and hybrid I Dos I typically see is they take a long time. After a few minutes, students’ attention – despite their best efforts – will likely wander, causing them to miss key points.
When planned, most teacher-led I Dos last around 30 seconds. This time is short enough for me to ask – and create the conditions – for intense focus from my students.
Part 4: Accessible design
Research suggests a number of steps teachers can take to make their modelling and explanations accessible to as many students as possible.
Peps Mccrea has a great poster that summarises the key findings and incorporates many of the ideas we have discussed above.

Part 5: Option: Check for listening
As discussed earlier, I do not check for understanding during the I Do. I have already checked for understanding of prerequisite knowledge during the Atomisaiton phase that precedes the I Do, and I will be checking for understanding of the new procedures in the We Do that follow the I Do. Hence, a well-planned, clear teacher explanation can be enough.
However, if you want evidence that your students are paying attention during the I Do – and by doing so, increase their levels of attention – you can include checks for listening during your I Do.

Here is an example from a teacher I coach:

The * indicate when she will check for listening.
In the classroom, this may play out as follows:
- Teacher: I am going to show you how to convert between pounds and dollars… what am I going to show you… Emma?
- Emma: How to convert between pounds and dollars
- Teacher: The conversion rate is for every £1 you get $1.50… what is the conversion rate… Tom?
- Tom: For every £1 you get $1.50
- Teacher: Every £1 gets $1.50 is known as the what… Mo?
- Mo: Conversion rate
And so on.
Notice the use of:
- Question first, name second, to maximise the number of students thinking
- The pause in between the question and the name, again to increase the number of students thinking
- Explain, Frame, Reframe to raise the level of attention needed
Notice how checks for listening depend on a clear and concise explanation. Students can only pay attention for so long, so we must ensure our explanation is carefully planned, avoiding vagueness, mazes and discontinuity.
Often, teachers worry that checks for listening will disrupt the flow of their I Do. I have two responses:
- It is a different kind of flow. So long as students are paying attention, they respond immediately, creating a continuous narrative that all are involved in
- Once attention during the I Do becomes the norm, you can reduce the frequency of the checks for listening. I would not recommend phasing them out completely.
Part 6: Option: Silent Teacher
Another option is to present the I Do in silence – an approach I (surprise, surprise) call Silent Teacher.
I like Silent Teacher for the following reasons:
1. Silent Teacher focusses students’ attention
You are at the cinema, people are chatting through the adverts and munching on their popcorn. Then, all of a sudden, the lights dim to indicate that the feature presentation is about to begin. What happens next? Almost immediately, conversations end, popcorn is put to the side, and focus ensues.
A similar thing happens in the classroom with Silent Teacher. Students need a cue that is the equivalent of those cinema light dimming. Something as simple as saying: We will begin Silent Teacher now… should do the trick.
This collective focus will not happen immediately with all classes. It is important to explain the purpose and expectations for behaviour during Silent Teacher and hold students accountable if they do not meet those expectations. However, many teachers have been surprised by how much focus their students show during that period of silent modelling and how much they tell them they appreciate it.
2. Noise begets noise
I watch many teachers deliver many worked examples, and I have noticed that the more the teacher talks, the greater the noise level in the room during that modelling. Even though the teacher has asked the students to remain silent, it is all too easy for words to be whispered and quiet conversations to simmer away under the cover of a teacher’s explanation.
Silent Teacher immediately eradicates that. During Silent Teacher, no one talks. The expectations could not be clearer. So, any noise at all is an easily audible infringement of that expectation, for which students can be held to account.
3. Silent Teacher supercharges the power of gestures
Research suggests that gestures (e.g. fingers pointing, heads shaking) and signals (colour contrasts, underlining) can direct students’ focus to the appropriate part of the I Do, thus improving learning outcomes.

I hypothesise that Silent Teacher heightens the power of teacher gestures because all students have to focus on is the teacher’s movements and the things they are writing without diverting some of that attention towards the words they are saying. To use a cinema analogy again, think how much more attention we pay to the movements of a mime artist versus those of a speaking actor.
These gestures can be achieved at the board, under a visualiser, or using a tablet. The medium is not as important as focussing students’ attention on the part of the model you want them to think about at this stage.
4. Silent Teacher promotes low-stakes self-explanation
Research suggests that self-explaining – an internal dialogue students have with themselves trying to make sense of what they see – positively affects learning.
On an episode of Ollie Lovell’s podcast in 2020, leading researcher Alexander Renkl explained that there are two types of productive self-explaining behaviour:
- Principled: where the student tries to explain what is going on
- Predictive: where the student tries to explain what is going to happen next
Silent Teacher provides a great opportunity to prompt students to engage in both of these behaviours. We can say to students:
Every time I pause, this is your cue to think: What have I just done, and what do you think I will do next.
Students often need an explicit cue, especially if Silent Teacher is new. I like to step away from the board (or move my pen away from the camera of the visualiser) and tap my head.
The stakes are essential here. Self-explaining does not involve explaining what is happening to your partner or the teacher. It is a moment of silent self-reflection – an opportunity to take crucial steps in piecing together a new idea without any pressure.
5. Silent Teacher provides an opportunity for Representation
Research on teacher change identifies three necessary components to understand an idea:
- Representation: see the whole process
- Decomposition: break the process down
- Approximation: rehearse the process
I find this a useful framework when considering modelling to students.
The mistake I made in modelling for many years was jumping straight to Stage 2. I would explain each step of the process, often line-by-line. The problem is that students have not seen the bigger picture – they do not know where each step leads. Silent Teacher is an opportunity to do just that. By allowing students to see the whole process from start to finish, they are in a much better position to both engage with and understand the steps of the process when we break it down, and then apply what they have learned when we give them a follow-up example to try.
What comes after Silent Teacher?
If the I Do started and finished with Silent Teacher it would be rubbish. We have not added the crucial verbal explanations needed to illustrate and illuminate what we have demonstrated visually. We also have zero evidence that anyone has been paying attention, let alone has understood. Silent Teacher provides a foundation for understanding, but it is just the first stage of the process.
Following Silent Teacher, there are a few options.
- Some teachers invite students to ask them questions, or write down questions.
- Others instigate a Turn and Talk to allow students to talk through the process with their partner and fill in any gaps.
I have experimented with both of these approaches and found them effective. But more often than not, I follow up Silent Teacher with a combination of narration and checks for listening. In other words, I use the clear, concise explanation I have planned and rehearsed in advance, including checks for listening at key points.
Part 7: Option: Turn and Talk rehearsal
Following our explanation, we can jump straight into the We Do. But if the procedure is complex, we may want to allow our students to rehearse the steps of the procedure with their partner in a Turn and Talk. This is the Approximation step from the research discussed above.
The instructions could be as follows:
You have all seen me go through the steps on the board. Please take the next 20 seconds to silently think through each step, trying to remember how I described it…
In a moment, I will ask you to talk through the I Do with your partner. Please describe each step as clearly as possible, and listen carefully as your partner does the same. The person closest to the door in each pair will go first, and you will change roles when I clap my hands.
Ready… 3…2…1…GO!
Want to know more?
The following books dive deep into the complexities of explanations and worked examples:
Implementation planning
Here are the ideas we have discussed:
Focussing thinking:
- Empty hands, eyes on me
- Ensure students can see and hear
- Avoid unnecessary visuals and words
- Keep the We Do hidden
- Model live
- Narrate diagrams, then add written text
- Integrate text and diagrams
- Don’t talk over novel text
Deliver a clear explanation:
- Avoid vagueness
- Avoid mazes
- Avoid discontinuity
- Accessible design
Options:
- Check for listening
- Silent Teacher
- Turn and Talk rehearsal
Use these ideas to complete the prioritisation exercise here.

Book and 90-minute online workshop

***You can purchase a book in paperback or on Kindle on the I Do, or a 90-minute online workshop that you can share with colleagues at a CPD event or departmental meeting***
