Learner-Generated Examples are when – surprise, surprise – the students come up with multiple examples given certain constraints, as opposed to the teacher setting questions for them to answer.
***You can purchase a 90-minute online workshop on Learner-Generated Examples that you can share with colleagues at a CPD event or departmental meeting here***
Diagnosis
- Do you challenge students to come up with their own examples?
- I1.If so, when and how do you structure it?
Evidence
For most of my teaching career, I have focused on improving the quality of the examples and questions I give students. I can use my knowledge and experience to design examples and questions that progress in difficulty, utilise key principles from Variation Theory, avoid erroneous generalisations, confront misconceptions, or are most like the exam questions students will encounter.


However, this means my students’ experiences are confined to what I present. This is very unlikely to be complete or optimal, both for me as their teacher, as I attempt to paint an accurate picture of their understanding, and for my students as learners, as they strive to demonstrate what they can do.
Research suggests that an effective complement to teacher-generated examples are Leaner-Generated Examples (LGEs). LGEs can be a valuable formative assessment tool for teachers, providing insights into student understanding, promoting mathematical thinking, and supporting the development of mathematical writing skills.
Solution steps
We could ask students to come up with examples without any additional guidance.
However, when we do this, students often gravitate to the same “obvious” example:


Or they generate examples that are not all that useful:


To avoid this, we need:
- Multiple examples
- Carefully selected constraints
Thinkers – a 2004 ATM publication by Chris Bills, Liz Bills, Anne Watson and John Mason – contains a set of prompts (or what I will refer to as frameworks) that challenge students to construct effective LGEs. Each framework requires multiple examples amidst constraints and is designed to draw out students’ natural power to generalise.
Here I will share my take on two of the frameworks from the book, plus another based on a conversation I had with Michael Pershan.
Framework 1. Give an example of…
Have a go!
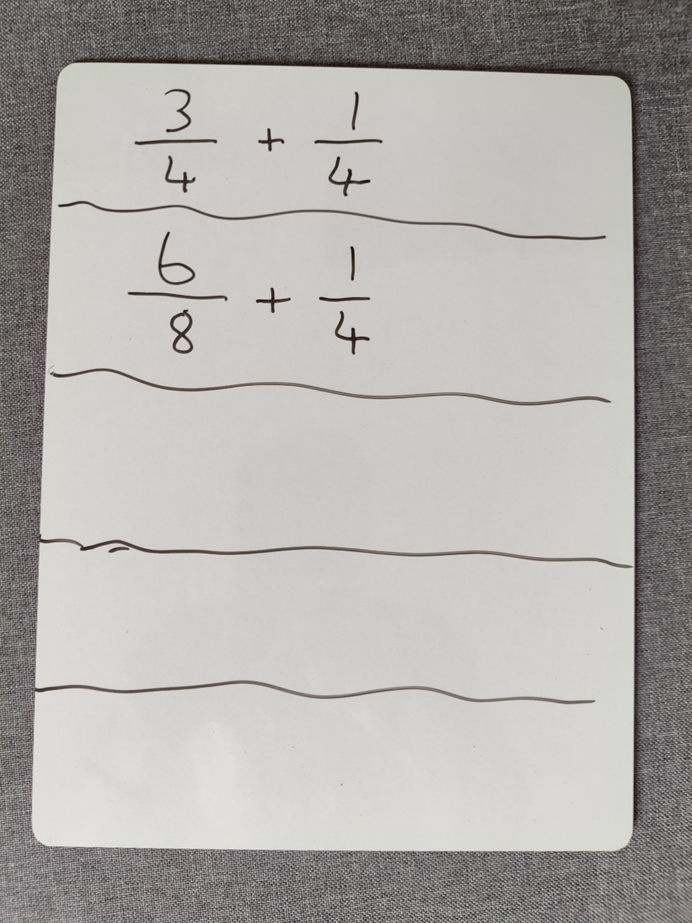
You will need a piece of A4 paper, or a mini-whiteboard, turned landscape, and divided up into quadrants:

In the top-left box, please write a fraction and its decimal equivalent.
When you have one…
- In the top-right box, please write another fraction and its decimal equivalent.
- In the bottom-left box, please write another fraction and its decimal equivalent that no one else will think of
- In the bottom-right box, please write a fraction and a decimal that are not equivalent but that someone might think are

Here are the responses of a Year 7 student to these prompts:

Why is this a useful framework?
Each example has a different purpose:
- Top-left: This is the initial example to kick-start the process
- Top-right: Asking for a second example moves students away from any obvious initial example, and starts students thinking about generalisation
- Bottom-left: Next we want a non-obvious positive example
- Bottom-right: And finally, a non-obvious negative example
Those final two boxes prompt students to generate boundary examples. Boundary examples are those right on the edge of a concept. Asking for an example that no one else will think of challenges students to push a concept to its limits. Asking for an example someone might think was correct but is not – in other words, an interesting non-example – tests whether students can take a small step over the concept’s boundary. This is a greater, more useful, challenge than asking them to think of any old non-example, as in the factors example at the top of this page. Sure, I could develop a selection of boundary examples for us to discuss. However, I know of no better way to check my students’ understanding of a concept than to set them up to generate these boundary examples themselves. Some examples will inevitably lie on the wrong side of the boundary, but this draws out misconceptions we can confront as a whole class.
How Give an example of… plays out in the classroom
Students respond on mini-whiteboards instead of paper, setting their boards out in quadrants as described above. Pause after each prompt to give students sufficient time to think and write. Students work silently and independently, keeping their eyes on their own boards.
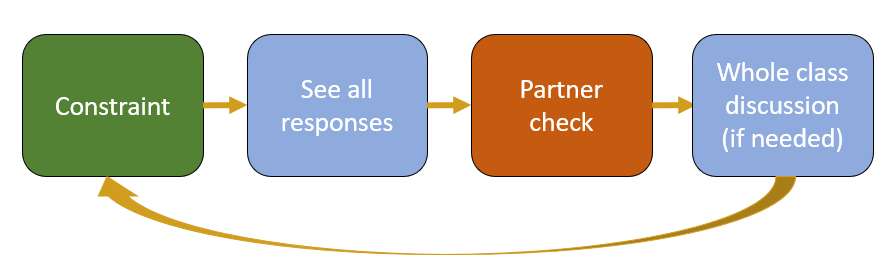
Here is an overview of how this activity progresses:

See all students’ responses
After sufficient thinking time – I can get a better sense of this by circulating the room – I ask students to hover their mini-whiteboards face down to show me they are ready. They then show me their boards containing all four examples on a count of 3, 2, 1…
Seeing all responses allows me to get a sense of my students’ understanding and ensure all students are participating. I pay particular attention to my weaker students’ responses, particularly their top two examples. I physically note any examples I wish to discuss with the class later – interesting correct or incorrect answers.
Partner check
There are too many possible correct and incorrect answers for me to check each student’s response individually. So, I use peer assessment. I ask students to swap mini-whiteboards and check each other’s work. They do so by ticking any examples they agree with and putting a question mark next to any they don’t. I say to my students: If you disagree with any particular answer, have a conversation about it with your partner, and if you still disagree, let me know. This always produces interesting examples that we can discuss as a class in the next stage of the process.
Whole class discussion
Following the partner check, we discuss any examples that students disagreed on, any I picked out when students showed their boards, or interesting examples I have prepared in advance. I record each of these examples on my whiteboard so they are visible. For each example, I ask students to think on their own if it is correct, vote with thumbs up or down, discuss with their partner, and then I can Cold Call students to hear what they have to say.
With a selection of interesting examples and non-examples on the board, the whole class discussion might be an opportunity to generalise: How can we quickly spot if a fraction and decimal are equivalent? How can we quickly spot if they are not?
Other examples


Framework 2. Additional constraints
Additional constraints is certainly more challenging for a teacher to write, but it can lead to some superb thinking and discussion amongst students.
Have a go!
This time, turn your piece of paper or mini-whiteboard so it is in portrait orientation, and divide it into five roughly equal rows.

In the top row, please write a pair of fractions that add together to give 1.
When you have a pair, in the next row, please write a pair of fractions that add together to give 1 AND have different denominators.
Here is a Year 7 student’s board at this stage:
Then, in the next row, write a pair of fractions that add together to give 1 AND have different denominators AND have the same numerator
Each example must fit the previous constraint, plus an additional constraint.
Here is the full list:
Think of a pair of fractions that:
- add to 1
- …and have different denominators
- …and the same numerator
- … and one fraction is improper
- … and the numerator is 13
If, at any point, you have already written an example that matches the new constraint, think of a second example.
Why is this a useful framework?
Again, we have the challenge of generating multiple examples, but the constraints are more explicit in this framework. The constraints can be designed in a way to not only increase challenge but also focus students’ attention on critical aspects of a concept or procedure.
How Additional constraints plays out in the classroom
Here is an overview of how this activity progresses:
See all students’ responses
With the first constraint announced (the two fractions must add to 1), I give students silent thinking and writing time, and then ask them to hover their mini-whiteboards face down to let me know they are ready. I then ask students to show me their mini-whiteboards. I do this at each stage of Additional constraints, whereas I wait until students have all four examples when using Give an example of. The reason for the difference is that Additional constraints produces a sequence of examples, and an unchecked error early on messes up everything that follows.
As before, I make a physical note of any interesting responses.
Partner check
I then prompt students to swap boards with their partners so they can check each other’s examples, marking them with a tick or a question mark. Once again, I tell my students that if they have a disagreement that they cannot resolve, they should let me know, and we can discuss it as a class. As we progress through the sequence, the Partner check also allows students to discuss how they constructed their examples.
Whole-class discussion
At any stage, I’m free to instigate a whole class discussion. I will do this if I’ve spotted any interesting answers or if a pair has a disagreement that needs resolving. If, however, all seems in order, I will skip this step and move on to the next constraint.
Additional constraint
Then we loop back to the beginning as we add an additional constraint.
Additional constraints tips
Here are a few ideas for helping the Additional constraints framework run as smoothly as possible:
Utilise Variation Theory
I often encourage students to look closely at their first example and see if they can modify it to match the second constraint. This is another example of how I like to use a key idea from Variation Theory – that meaning is found as things change amidst a background of sameness. This supports struggling students as they have a starting point, but it can also challenge other students as they seek to explain the relationship between the consecutive examples.
Speed demons
Students hover their mini-whiteboards so I can easily tell which students have their examples ready to show me. If I have one or two speed demons, hovering their boards like mad men ready to show me their response, I will challenge them to think of an example no one else will think of that also matches the current constraint.
If students get stuck
Students will get stuck as constraints are added and the difficulty ramps up. Circulating the room as students are working helps you pick up on this. In these cases, I stop the class, ask if anyone thinks they have an example that works, and we check it together. I then ask that student to describe their strategy for coming up with the example. I can then ask the rest of the class to either use that strategy to come up with their own example, or – if they already had an example – see if they can come up with the most interesting answer they can think of.
Allow collaboration
Another option, as the challenge increases and students start to get stuck, is to allow collaboration. I always give students silent thinking time first and then allow them to work with their partner to see if they can find an example that works between them.
Extra challenge
A nice challenge to ask at the end of the sequence is if students can think of an additional constraint to tag onto the end that still allows another example to be generated.
Strategy and generarlisation
As we progress through the constraints, I’ll use the whole class discussion to collect several examples for each additional constraint and ask students how they constructed their examples. Not only does this offer a great insight into their understanding, but it can also put us on the path to finding more examples that work as we move to generalisation.
Other examples
Other examples of Additional constraints that I have used in maths lessons include:
Think of a set of 6 numbers that:
- have a mean of 5
- …and a mode of 2
- …and a median of 4
- … and a range of 10
- … and two of the values are non-integers
Write down a sequence of numbers that is:
- linear
- …and is descending
- …and contains at least one non-integer term
- … and has a 3rd term of 15
- … and has an 8th term of 13
Framework 3. What if?
Have a go!
Divide your piece of paper or mini-whiteboard into two columns.

- I will write 5 different numbers with an integer mean: 3, 5, 8, 9, and 15, which have a mean of 8.

- On the left-hand side of your page, write a set of 5 different numbers that have an integer mean that is different to mine, showing your working out. For example, it might look like this:

Now, I would like you to choose one of your numbers and add 20 to it.
Write your new set of numbers on the right-hand side like I have:

Here is a student’s mini-whiteboard:

What do you predict will happen to the mean? Will it increase, decrease, or stay the same? If you think the mean will change, can you predict how much it will change? Write your prediction below your new set of numbers.

Now, on the right-hand side of your piece of paper, work it out.
Here is mine:

And here is a student’s mini-whiteboard:

At this stage – as we will see below – students compare predictions, answers, and explanations with their partner, looking for a relationship between their answers even though they started with different numbers.
Now clean the right-hand side of your board.
Let’s do one more What if, using our original 5 numbers as the starting point.
What if you double your 5 numbers and work out the mean of the set of 10?

Can you predict what will happen to the mean this time?
Why is this a useful framework?
What if? makes use of two of my favourite things:
- Variation theory – with each example. just one thing changes, and students have an opportunity to conjecture what impact that change will have
- The Reflect, Expect, Check, Explain framework I use with Intelligent Practice:
- Reflect: What has changed? – the total has increased by 20
- Expect: What do you think will happen to your answer? – the mean will increase
- Check: Work out the actual answer and compare to your prediction – the mean increased by 4
- Explain: Can you explain the relationship between answers, first on your own and then with your partner? – my partner’s mean increased by 4 as well. I wonder why?…
The power of the What if? structure comes from the fact that students are all working on different examples and yet noticing the same relationships. Often you hear exclamations such as: Wow, that happened with mine too!, during the paired discussion. This allows us to move towards explanation and generalisation when we pick examples to share as part of the whole-class discussion.
How What if? plays out in the classroom
Here is an overview of how this activity progresses:
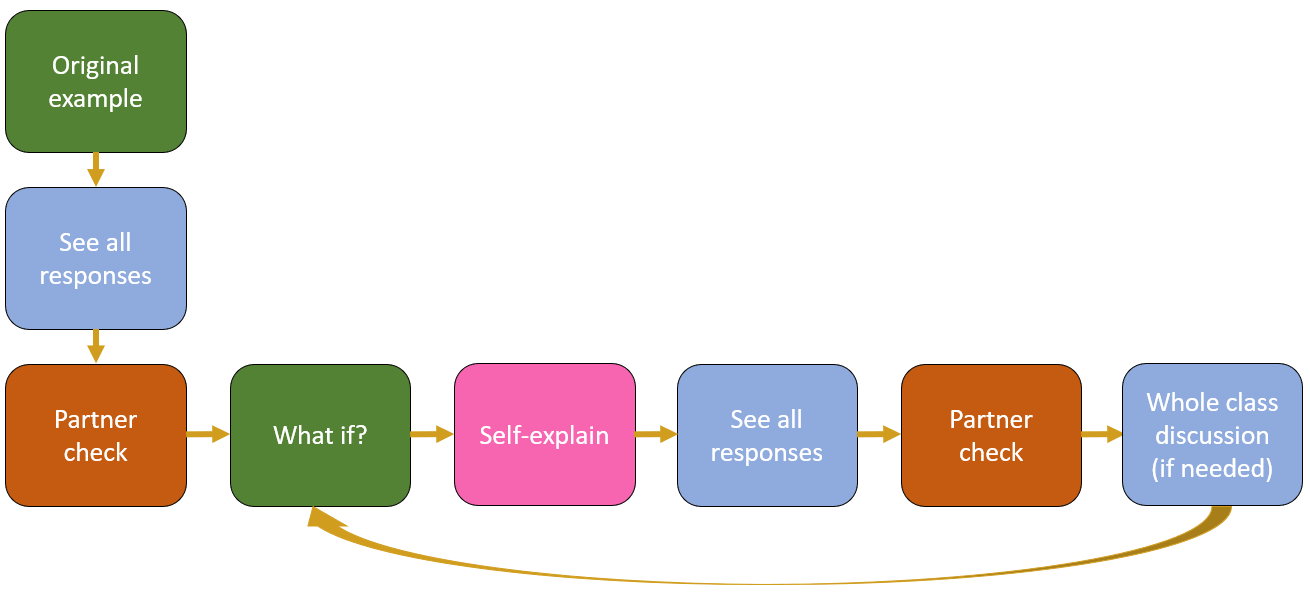
Original example
I write my example and answer on the left side of my board so students can see. I will continue to write my examples and answers throughout the sequence that follows. Students do the same with their example on their mini-whiteboards.
See all responses
I do a quick check of students’ responses, focussing my attention on the boards of my weaker students.
Partner check
The purpose of this initial partner check is to make sure students have followed instructions and got the initial example correct.
What if?
Having dealt with any issues, I then introduce the first What If. I model the What If using my numbers on the right-hand side of my board so students are clear about the change I am making. I write the new example, not the working out or the answer.
Self-explain
After announcing each What if?, I encourage students to take a moment to predict what they think might happen for their example and write this prediction on their mini-whiteboard.
- Will the answer increase, decrease or stay the same?
- Can they predict an actual value?
Students then work out the answer independently, writing it below their new example in the right-hand column. I then prompt them to pause and reflect:
- Did the answer match their prediction?
- How would they explain what is going on?
This opportunity for self-explanation is key. Modelling how I, as a teacher, make predictions and reflect and sharing examples from students that I see on mini-whiteboards around the room is important to promote good practice.
See all responses
Then I ask students to hover their boards and show me when called upon so I can make a note of any interesting responses.
Partner check
Next, I ask students to discuss their answers with their partners. Here I tell them to do three things:
- Check each other’s work
- See if the relationship they noticed between their examples is the same for their partner’s
- Can they come up with the best explanation as to why
Whole-class discussion
I then Cold Call a few pairs to see what relationship they uncovered. With a number of different examples to work with, including my own, we can try to explain what is going on.
The next What if?
We continue in the same way for each new What if?. Students write each new example in the right-hand column and then rub that out when we have finished discussing it. Their first example always remains visible in the left column as that is always the example we compare against. I model this each time with my example.
Here are some other What Ifs with the same set of starting numbers:
What if you…
- Halve all the numbers?
- Subtract 1 from each number?
- Include an extra number equal to the mean of your 5 numbers?
- Include an extra number equal to 6 more than the mean of your 5 numbers?
Other examples
Start with a fraction of an amount problem 𝑎/𝑏 𝑜𝑓 𝑐 where 𝑎 is even, and the answer is an integer.
What if you…
- Halve the value of 𝑎?
- Double the value of 𝑏?
- Swap the values of 𝑎 and 𝑐?
- Add b onto c to create a new 𝑐?
- Have 1 𝑎/𝑏?
Start with the first 5 terms of an ascending linear sequence, and work out the nth term rule
What if you…
- Subtract 1 from each term?
- Double each term?
- Start with the same number but go up by 1 more than before?
- Change the sign of each term
- Reverse the sequence?
FAQs
Do I need to use mini-whiteboards for these frameworks?
Mini-whiteboards are useful for all three of these frameworks for LGEs for the following three reasons:
1. Students are more willing to give things a go. If they know they can rub out their work, then they are more likely to try things.
2. Mini-whiteboards make checking for understanding much easier
- I can more easily see student responses as I circulate the room.
- I can use hover your board to easily see when my students are ready far easier than if students are working in books and I say put your pens down.
- At any stage, I can ask my students to show me their mini-whiteboards so I can get a snapshot of whole-class understanding. This also allows me to make a physical note of any misconceptions or interesting examples that we can discuss as a class.
- I can grab a board and stick it under the visualiser or hold it up so everyone can see.
3. Mini-whiteboards make peer assessment and discussion much easier
Partner Talk is a key element of all three frameworks, and such discussion is made so much easier with mini-whiteboards. Students can swap boards much easier than they can swap books, and mistakes and messy annotations can be rubbed away.
When could I use these frameworks?
- As a relevant prior knowledge check. These three frameworks allow us to revisit concepts students have met in the past in a more interesting and challenging way.
- As a supplement (or alternative) to Consolidation. Students gain valuable practice both in the generation of their own examples and in the checking of their partners’. The opportunity to generalise and describe their strategy also takes this above and beyond the type of fluency practice I would usually give my students.
- As an end-of-lesson check for understanding. Students may have been working on a concept all lesson, gaining valuable fluency practice. But what do they really know? The depth of challenge elicited by these three frameworks and their inherent mass participation makes them an ideal end-of-lesson activity.
- As part of a homework or assessment. The frameworks are self-differentiating in their nature, making them ideal assessment material. Experiment with one at the end of a topic assessment or homework.
How long should these frameworks take in a lesson?
Great question, terrible answer – it depends. If students’ knowledge is not secure and you need to do lots of discussion, questioning and modeling, then they may take up to 30 minutes. If students’ knowledge seems secure, then you might spend five minutes on a framework. However, in this case, you may take the opportunity to probe students’ understanding further, focusing on interesting examples and non-examples, student strategies, or explaining relationships.
Implementation planning
- Choose a class you feel comfortable trying with
- Choose an upcoming topic that the class is studying
- Choose one of the three LGE frameworks from above
- Design an activity
- Give it a go!
90-minute online workshop
If you have enjoyed reading this and want to share the ideas with colleagues and help support my work, you can purchase a 90-minute online workshop all about Learner-Generated Examples here.